From the job shop to the robotic assembly floor, it is vital that the product be made well and correctly coated for protection, aesthetics, and performance. Therefore, industries like automotive, aerospace, and those utilizing plating, anodizing, powder coating or other coatings need accurate coating thickness measurement. This is particularly important when the coatings play a critical role in preventing the corrosion or wear of metal substrates.
ACCURATE COATING MEASUREMENTS IN THE FIELD
Properly applied coatings, with thickness measured in mils (.001 inch) or microns (.001 mm), are also essential for paint/coatings contractors and companies that coat a wide range of building and functional surfaces, including pipe. Accurate application and coating thickness measurement, in fact, are crucial to avoid coating breaches leading to corrosion of the underlying substrate. This can help to prevent leaks and other safety issues in a wide range of industries.
However, until recently conducting frequent laboratory-quality coating thickness tests throughout the manufacturing process or in the field has been difficult. Traditionally, this required meticulous sampling and preparation, as well as taking the sample to the lab for evaluation. Although portable coating thickness gauges are not new, most fail to provide the accuracy, speed, or simplicity required for anyone to conduct quick checks as needed on the production line or in the field.
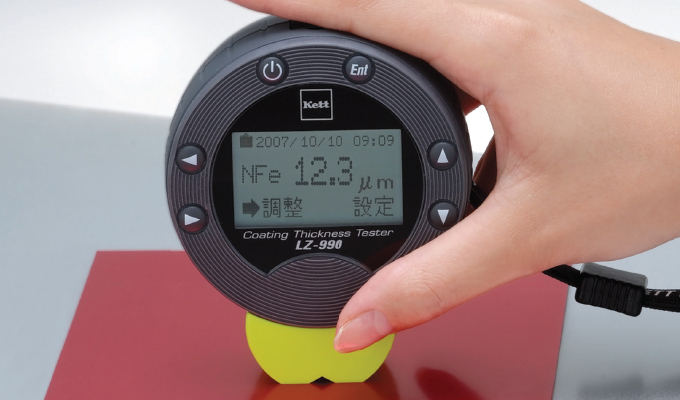
Fortunately, handheld devices are now available that allow personnel to easily and quickly perform lab-quality coating thickness measurements. Some options offer instant coating thickness measurement of almost any non-magnetic coating on both ferrous (magnetic) and non-ferrous (non-magnetic) substrates. This is possible using only one hand, even on curved and complex surfaces.
By simplifying the process, industrial facilities and paint/coatings contractors and companies can increase the quality of their products and services from start to finish while optimizing cost.

THE MANY BENEFITS OF COATING THICKNESS READINGS
Coating thickness directly affects product quality, whether for automotive paint, electroplating, anodizing, or a wide range of other coating applications. For example, checking the paint coating consistency on a vehicle not only provides a product with a superior finish, but can also offer essential data about the consistency of the paint when it is wet.
Incorrect paint consistency can affect drying times or eventual flaking of the paint film. Too little paint coating and you are left with cosmetic issues in opacity, and protective issues like corrosion, wear, and exposure. Checking coating thickness can also tell if auto body work has been done on a used car, which can help the customer or dealer make a good decision on pricing.
When specificity and adhesion matter in anodizing and electroplating, a coating thickness gauge should be able to read the thickness of the coating to the most minute measurement. This can play a major factor in preventing corrosion while optimizing the process by eliminating any excess use of the expensive plating product.
Another way a coating thickness gauge can make a significant impact is in testing anti-corrosion pipe coatings to find weak spots, where the coating is too thin and a breach of the coating could make the substrate susceptible to corrosion.
Knowing about these trouble spots can prevent a disaster well before it occurs. This might involve petrochemical pipes in a facility, water pipes in a home or office, or even the piping and tubing in an engine.
A nondestructive gauge is a perfect way to ensure that the pipe’s protective coating has not been applied too thinly or become so over time. Excessively thin coatings are more likely to be chipped or breached, which can lead to corrosion promoters like water or oxygen getting under the coating and accelerating corrosion in the substrate.
SIMPLIFYING COATING THICKNESS MEASUREMENT
Although traditional laboratory and online based coating thickness measurement techniques are useful in the right settings, they have lacked the simplicity and flexibility required for frequent spot checks. Often, this involves sampling, sample preparation, and taking the sample to the lab for evaluation, which requires the participation of staff adequately trained for the process.
Other conventional coating tests, such as scratch testing, have been destructive or invasive and damaged the sample. This meant that a product could not be returned to the production line, or that a coated surface had to be recoated or repaired in the field at additional expense. Also, since only a small portion of the component or facility may be tested, results may not be representative of the entire situation.
Consequently, various portable coating thickness measurement devices have been developed. However, these have not always provided the necessary accuracy or been sufficiently easy to use.
Another drawback is that in certain environments with multiple substrates, the devices typically either had difficulty determining the substrate or utilizing the correct test for the application. So, multiple measurement devices had to be used, which complicated testing and added cost.
Finally, typical coating measurement methods were usually unable to accurately measure curved or complex surfaces. This left pipe as well as convoluted component designs largely unable to be easily spot checked for coating compliance.
In response, industry innovators have developed a number of advanced designs for handheld coating thickness test devices. For units used on the production line and in the field, these significantly improve accuracy, versatility, and ease of use.
THE LZ990 PORTABLE COATING THICKNESS GAUGE
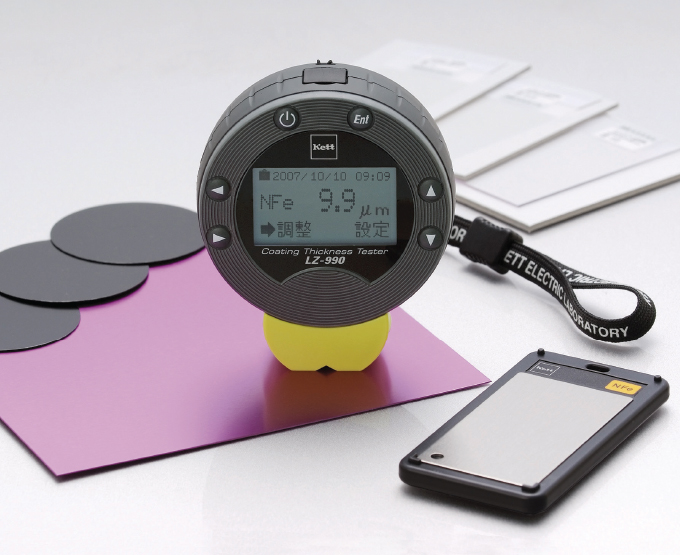
One example, the LZ990 portable coating thickness gauge by Kett combines two of the most widely used measurement methods, magnetic inductance and eddy current, in a dual mode device that can measure the coating thickness of almost any non-magnetic coating on both ferrous (magnetic) and non-ferrous (non-magnetic) substrates.
Since the unit is able to automatically determine the substrate and use the appropriate measurement circuit, this enables instant, non-destructive testing on painting, plating, anodizing, and organic coatings with accuracy up to 0.1 um. Such testing takes less than a second to display the measurement.
Because the key to providing accurate, repeatable measurements is the operator’s ability to reliably make consistent contact between the instrument and the test surface, the unit also utilizes a spring-loaded probe to generate a consistent contact pressure with the measured surface. This integrated probe also includes built in edge guides to enable easy measurement of even curved and edged surfaces. To ensure device stability during measurement, the foot of the probe is also designed to provide a firm platform when placed onto the test piece.
SIMPLE DESIGN, RELIABLE RESULTS
A number of other design considerations in handheld coating thickness gauges can also simplify measurement and improve versatility.
In order to improve accuracy and durability on the factory floor or in the field, it is best for the unit to have no moving parts, other than the probe. Similarly, the unit should be impervious to vibration, with measurement independent of its orientation.
To save time during the testing process, he recommends utilizing a unit with a large screen that enables the quick reading of results. Those results should be able to be stored in the gauge and transferred to a computer and/or printer for documentation and averaging purposes. An instrument that stores many test measurements is best so operators can perform numerous tests before downloading the results.
Easier, more accurate coating and plating measurement with handheld units will help to improve quality checks wherever needed. So, defects can be immediately detected and corrective action undertaken to minimize scrap and faulty end-products.
FOR MORE INFORMATION
Siemens Digital Industries Software, a business unit of Siemens Digital Industries, is a leading global provider of software solutions to drive the digital transformation of industry, creating new opportunities for manufacturers to realize innovation. With headquarters in Plano, Texas, and over 140,000 customers worldwide, we work with companies of all sizes to transform the way ideas come to life, the way products are realized, and the way products and assets in operation are used and understood. For more information, visit www.sw.siemens.com.
John Bogart is managing director of Kett US. Kett provides instant moisture meters, organic composition analyzers (fat/oil, protein, ash, BTU, bulk density, coatweight.) instant coating thickness testing, and unsurpassed friction measurement, wear testing, peel tests, adhesion tests, and other physical property testing—with simple, elegant, durable instruments. For more information, call 800.438.5388, email support@kett.com, or visit www.kett.com.
MODERN PUMPING TODAY, June 2019
Did you enjoy this article?
Subscribe to the FREE Digital Edition of Modern Pumping Today Magazine!


